

Grafana Cloud Synthetic Monitoring: How to simulate user journeys to ensure the best possible end-user experience
Here at Grafana Labs, we have a long-standing commitment to helping our users understand how their applications and services behave from an external point of view. This critical practice — known as synthetic monitoring — has been a key focus of ours for nearly a decade.
Back in 2015, we released worldPing, our first product to help measure the user experience and improve website performance. Then, in 2020, we introduced Synthetic Monitoring in Grafana Cloud, the successor to worldPing that delivered new and more robust capabilities to proactively monitor and enhance the end-user experience.
Today, we’re excited to share that the evolution continues with the launch of our revamped Grafana Cloud Synthetic Monitoring. Powered by Grafana k6 and featuring two new check types — MultiHTTP and Scripted — Synthetic Monitoring enables you to simulate even the most complex transactions and user journeys.
Moving beyond protocol tests
Until now, Synthetic Monitoring used the Prometheus blackbox exporter to test at the protocol level: HTTP, DNS, TCP, gRPC, and ICMP (for ping and traceroute). This worked well for health and uptime monitoring, but it didn’t cover the full range of synthetic monitoring use cases.
To ensure the reliability of systems today, developers, platform engineers, and SREs need to monitor increasingly complex transactions and critical user journeys. These usually involve multiple steps, each of which needs to be validated. We couldn’t do this with blackbox exporter, but Grafana Labs does have a product purpose-built for this kind of testing: k6.
Synthetic monitoring with k6
k6 is designed for load testing, but it has capabilities that are perfect for synthetic monitoring, including:
- A high-performance JavaScript engine written in Go
- A scripting API designed to help simulate and test real application traffic
- Protocol support for HTTP, WebSockets, and gRPC
- Built-in metrics, with the ability to add custom metrics and logs to help with troubleshooting
It was clear k6 would complement blackbox exporter nicely, so over the past year, we’ve gradually integrated it into the Synthetic Monitoring architecture. The first k6 check types are now ready to use.
Introducing MultiHTTP and Scripted checks
Today we are rolling out two new features — powered by k6 — for creating multi-step synthetics that simulate complex transactions and user journeys:
- MultiHTTP checks (generally available): Provide a form-based approach for defining multi-step tests. Under the hood, the form generates a k6 script, so you don’t have to write code.
- k6 Scripted checks (public preview): Give you the power and flexibility to define your workflow tests in JavaScript, using the k6 API to efficiently author tests.
With both types, you chain steps together to simulate a workflow, passing data from one step to the next. You can validate each step in a workflow by defining assertions, which are boolean conditions that confirm you got the expected results. As with all other check types in Synthetic Monitoring, you can still:
- Automatically set up/deploy and maintain checks via our API and Terraform provider.
- Activate prebuilt Prometheus-style alerts — or define your own — to proactively track SLOs and notify on-call teams of problems.
- Use built-in dashboards to visualize results, analyze them, and quickly access the relevant logs, traces, and metrics that will help resolve a problem.
Example: testing a workflow
A user workflow will often look something like this:
- Log in to a site or service
- Perform an operation (like creating an object), then do the reverse operation (delete the object)
- Log out
Using a synthetic monitor, we can ensure a good experience for end users by continuously validating that this sequence works and is sufficiently fast. Let’s build an example using test-api.k6.io, which provides a set of public endpoints to simulate the workflow steps above. We’ll simulate this both as a MultiHTTP and a Scripted check, so you can compare them side by side.
MultiHTTP
test-api.k6.io provides a simple REST API to manage a list of pet crocodiles. These “crocodiles” are simple test objects that consist of a name, gender, and date of birth. (Why crocodiles, you might ask? Because the k6 mascot is a crocodile!)
We’ll use the API to do the following:
- Log in using a predefined
"synthetics_test_user" - Add a crocodile object to the user’s list, then delete it
- Log out
Let’s take a closer look at each of these steps.
Login
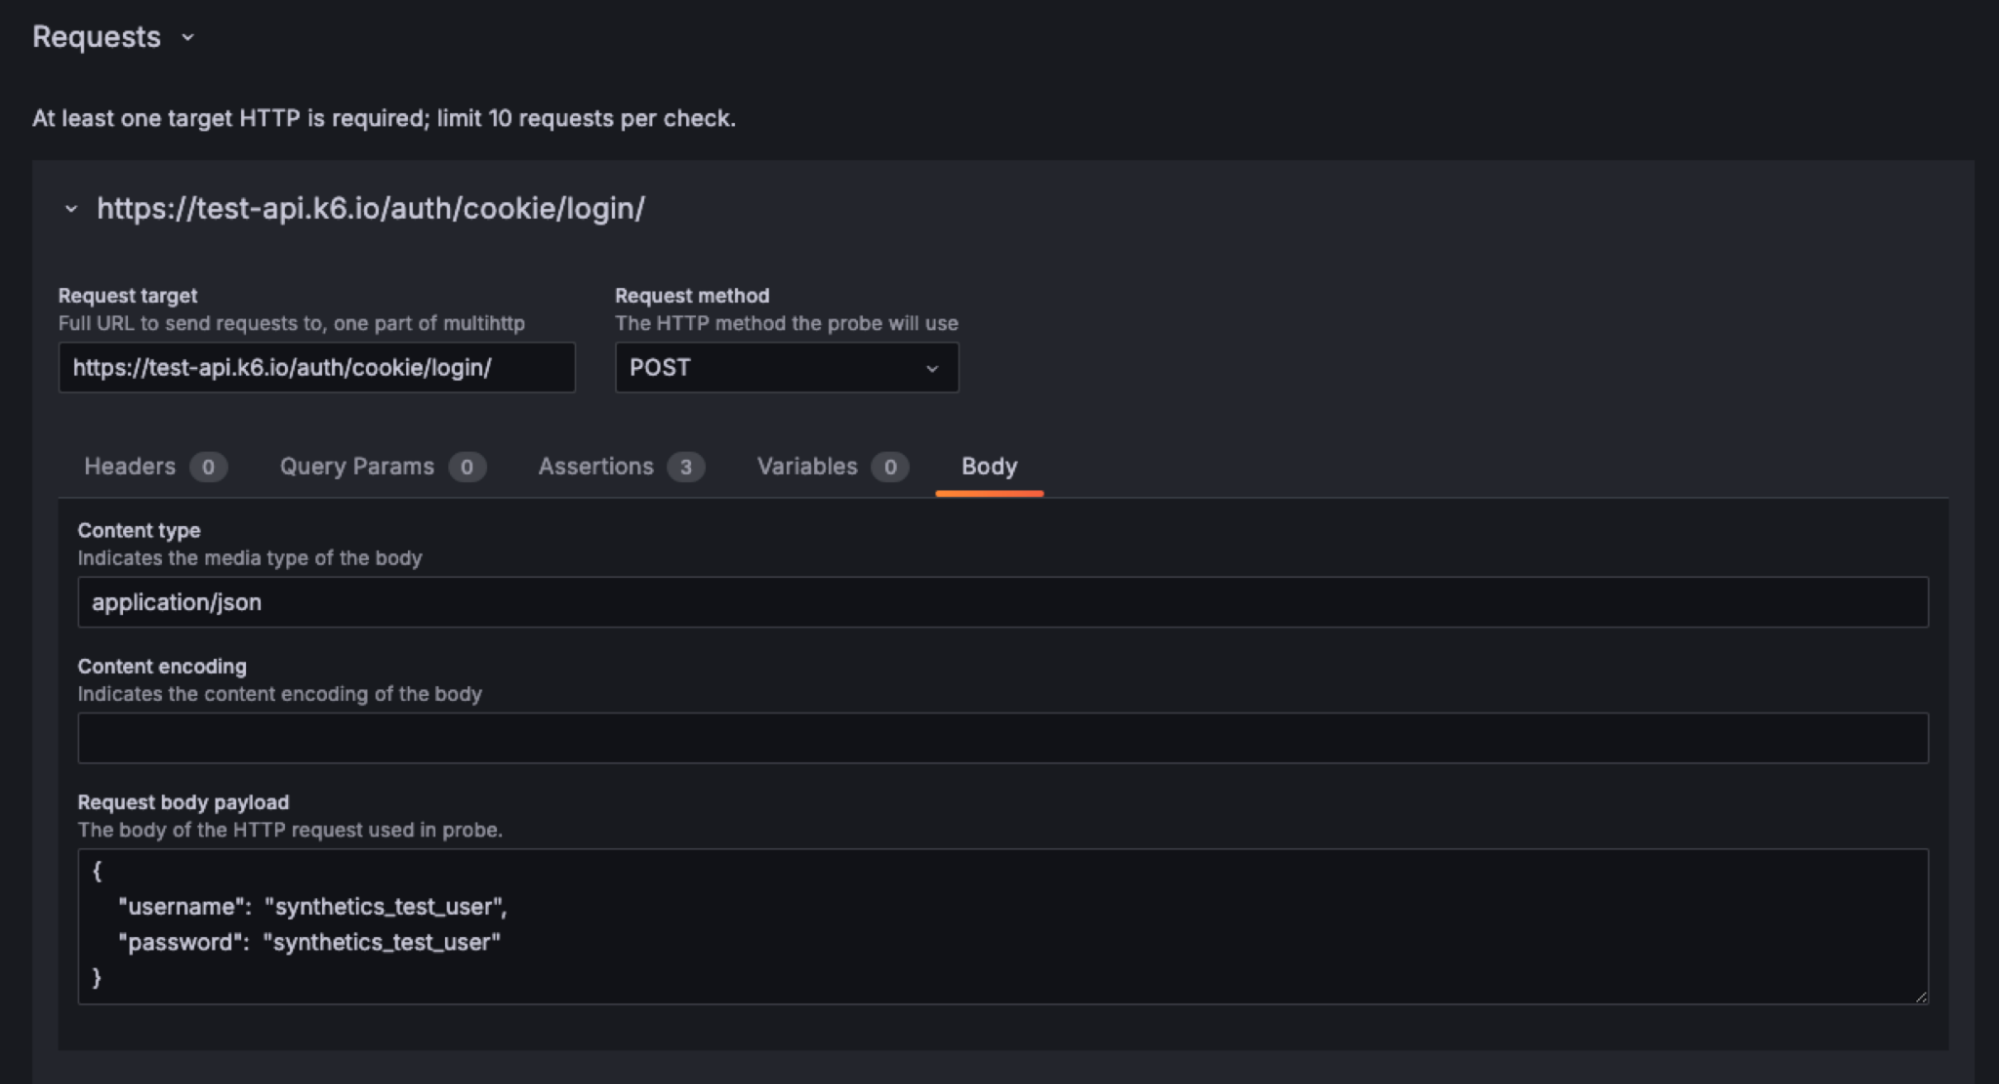
After setting a job name, selecting probe locations, etc., you’ll specify a sequence of HTTP requests. The first is a call to https://test-api.k6.io/auth/cookie/login/, passing a JSON request body with the username and password.
{
"username": "synthetics_test_user",
"password": "synthetics_test_user"
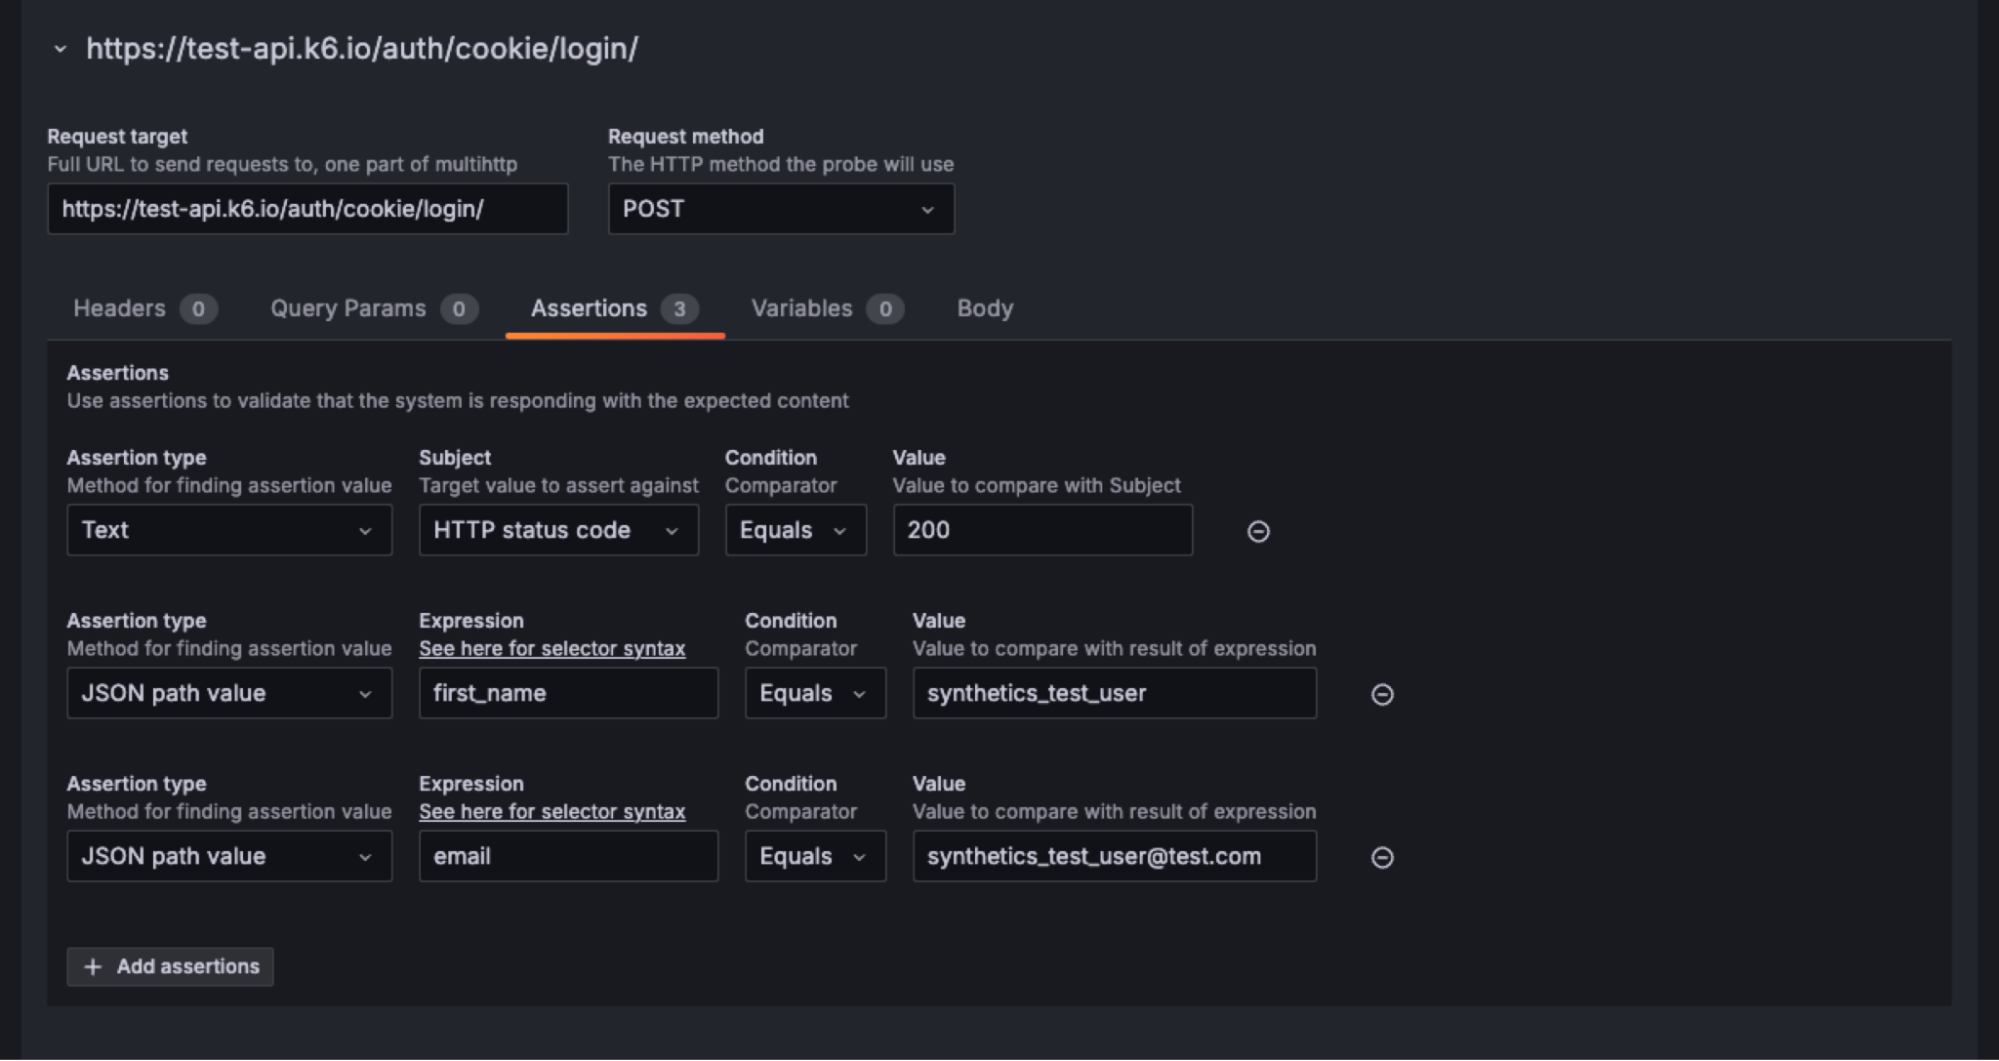
}We’ll then validate the result using assertions to check for:
- A 200 HTTP response code
- The expected username
synthetics_test_userin the response body - The expected email address
synthetics_test_user@test.comin the response body
Note that this login call will create a session cookie, which is needed to authenticate subsequent calls. k6 handles the session cookie for us just as a browser would. It transparently manages the receipt, storage, and transmission of cookies.
Create and delete
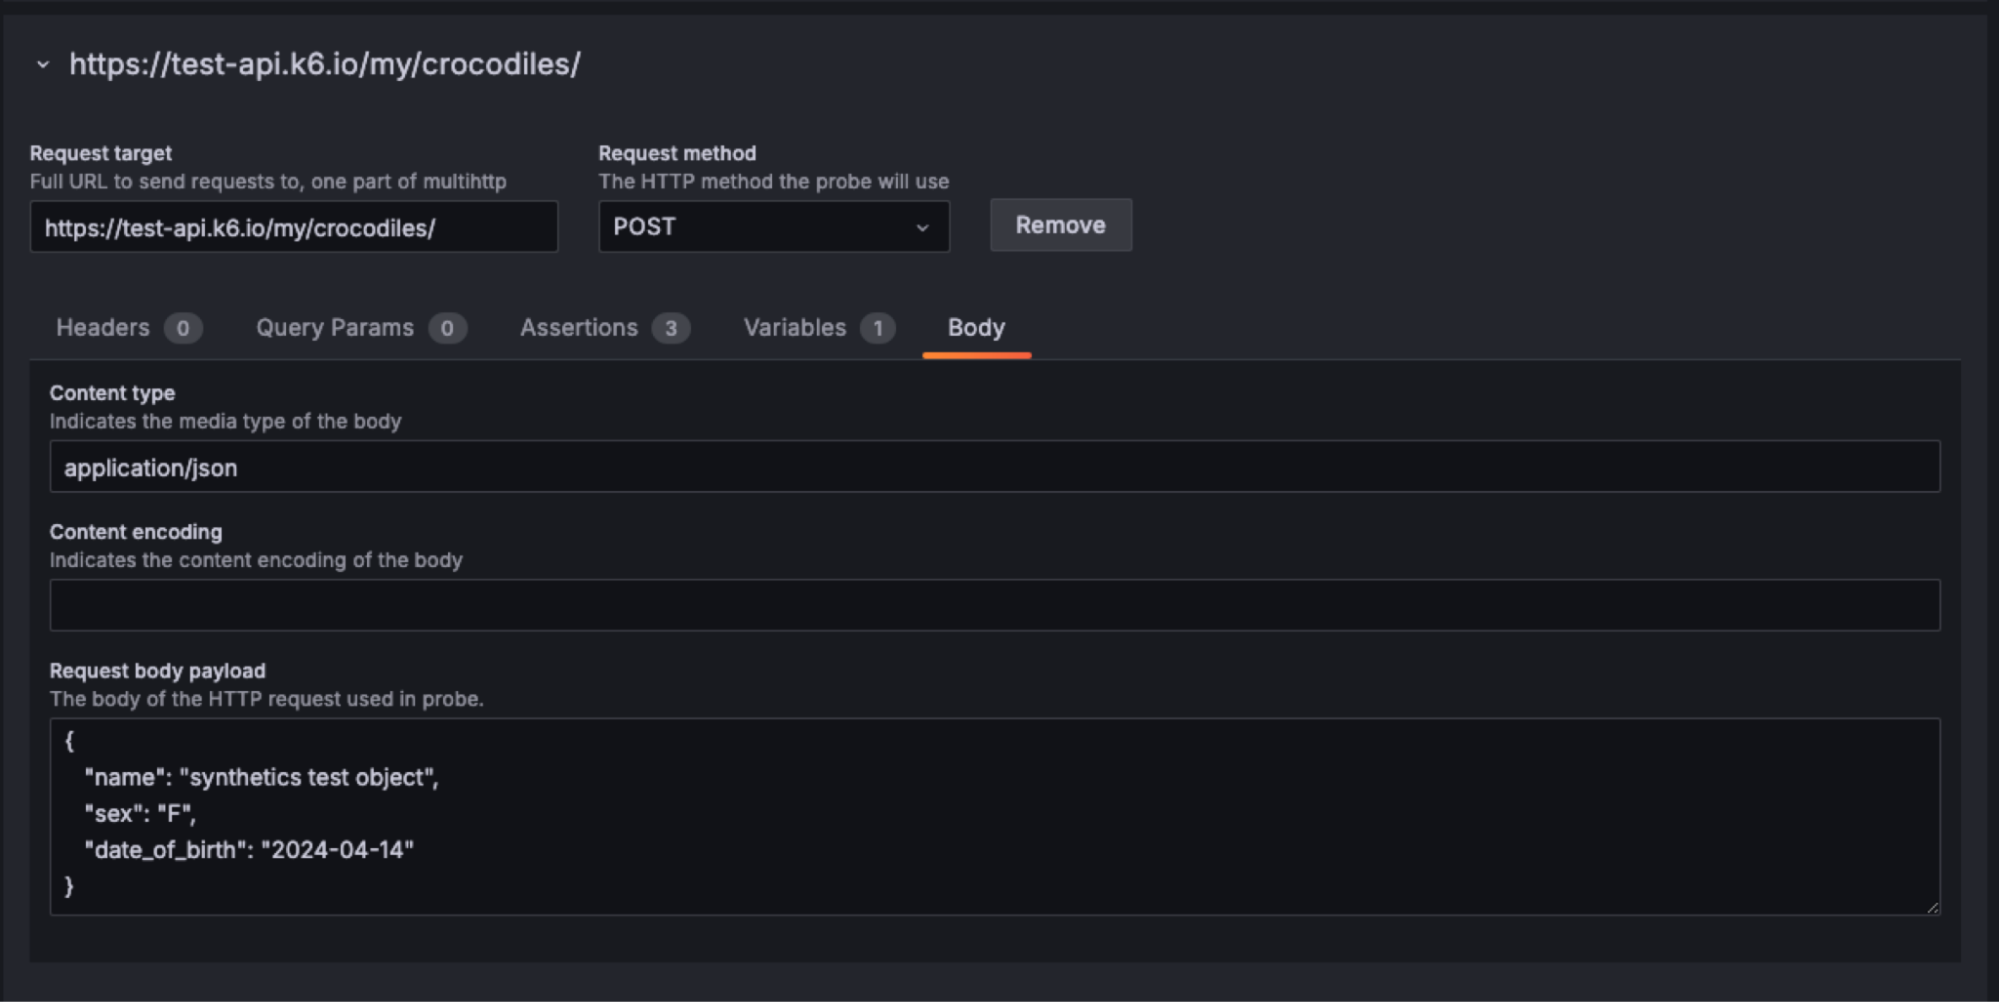
Next, let’s call the POST my/crocodiles/ endpoint to create a new crocodile object, passing a payload with name, gender, and date of birth.
{
   "name": "synthetics test object",
   "sex": "F",
   "date_of_birth": "2024-04-14"
}
We’ll assert that:
- The call succeeds with an HTTP 201 response code
- The JSON response contains the expected name
synthetics test object
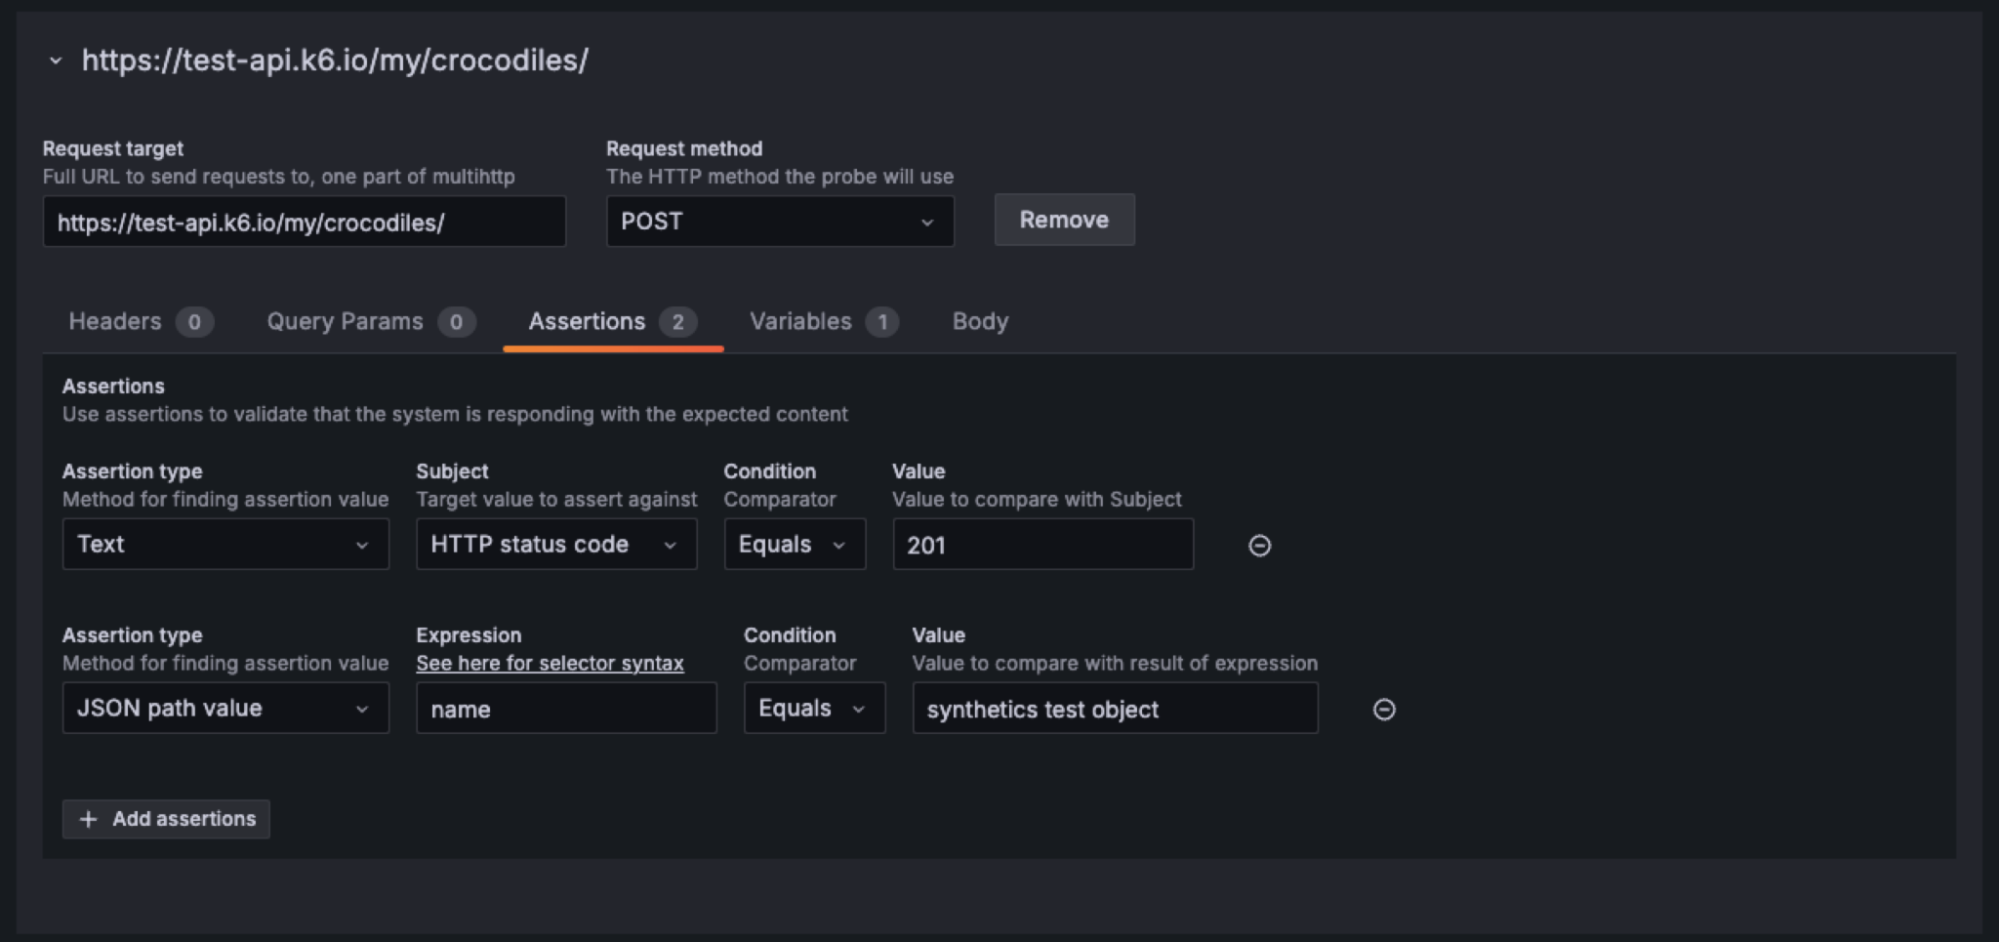
For the next step, we’ll need the crocodile object ID. Create a variable called objectId, and save the value from the id field in the JSON response in that variable.

Now we’ll invert the creation and delete the object with the DELETE my/crocodiles/ endpoint. Using the saved objectId variable, we can build the request path: https://test-api.k6.io/my/crocodiles/${objectId}/. Then we’ll assert that the response code is HTTP 204.

Logout
Finally, we’ll call the POST auth/cookie/logout/ endpoint and assert a response code of HTTP 200 to complete the workflow.

k6 Scripted
Our MultiHTTP check does the job, but as workflows grow in complexity, they become harder to properly simulate without the flexibility of code. Here are some additions we could make:
- Creating a new user: Right now, we use the same user across checks. This means the test user must exist ahead of time in each environment, making the test less portable.
- Test isolation: Running the monitor from multiple probe locations with a shared user means we’ll see concurrent edits, leading to unpredictable results if we ever extend our test to cover APIs like
GET /my/crocodiles/that list a user’s crocodile objects. By creating a new user for each monitor execution, we avoid this. - Dynamic field values: To test a range of inputs, we could dynamically generate field values like the name, gender, and date of birth, which are currently static.
Let’s create a scripted version of the same workflow that covers these items. After you open a new Scripted check, set a job name, select probe locations, etc., you see a script editor with a default example like this:
import { check } from 'k6'
import http from 'k6/http'

export default function main() {
  const res = http.get('http://test.k6.io/');
  // console.log will be represented as logs in Loki
  console.log('got a response')
  check(res, {
    'is status 200': (r) => r.status === 200,
  });
}
The default function contains our test code. Let’s start modifying this function to build out the workflow.
User registration
Rather than a predefined test user, with Scripted checks we’ll use JavaScript to generate user info and create a new user each time this monitor executes. We use the k6 randomString function from k6-utils to generate a random first name, last name, email address, and password.
import { check } from 'k6'
import http from 'k6/http'
import { randomString } from 'https://jslib.k6.io/k6-utils/1.2.0/index.js';

export default function() {

    // Generate user info
    const first_name = randomString(10);
    const last_name = randomString(10);
    const email = `${first_name}.${last_name}@test.com`;
    const password = randomString(10);
Next, we’ll pass that data to the user/register/ API, and then assert an expected HTTP status code of 201 using the check() function.
 // Generate user info
    const first_name = randomString(10);
    const last_name = randomString(10);
    const email = `${first_name}.${last_name}@test.com`;
    const password = randomString(10);

    // STEP 1: Register a new user
    let response = http.post("https://test-api.k6.io/user/register/", {
        first_name,
        last_name,
        username: email,
        email,
        password
    });

    check(response, {
        '1. User registration': (r) => r.status === 201,
    }) || fail(`User registration failed with ${response.status}`);
Login
Then, we’ll call the auth/cookie/login endpoint like we did in the MultiHTTP example, and use the check function to define an identical set of assertions. Comparing the Scripted and MultiHTTP versions of this step, side by side, shows how similar they are:
// STEP 2: Autheticate
    response = http.post("https://test-api.k6.io/auth/cookie/login/",
      { username:email, password });

    check(response, {
        "2a. login successful": (r) => r.status === 200,
        "2b. user name is correct": (r) => r.json('first_name') === first_name
        "2c. user email is correct": (r) => r.json('email') === email
    })
Compare with the equivalent MultiHTTP section:
Create and delete
Next, we’ll create a crocodile object, dynamically generating the name, gender, and birth date. As we did in the MultiHTTP example, we’ll save the id as a variable to use when calling the delete API.
import { check } from "k6";
import http from "k6/http";
import { randomString, randomIntBetween } from 'https://jslib.k6.io/k6-utils/1.2.0/index.js';

...

    // STEP 3: Create a "crocodile" object
    const name = randomString(10);
    const sex = ['M','F'][randomIntBetween(0,1)];
    const date_of_birth = new Date().toISOString().split('T')[0];

    response = http.post("https://test-api.k6.io/my/crocodiles/",{name, sex, date_of_birth});

    const id = parseInt(response.json('id'));
    check( response, {
        "3a. Crocodile created and has and id": (r) => r.status === 201 && id && id > 0,
        "3b. Crocodile name is correct": (r) => r.json('name') === name
    });

    // STEP 4: Delete the "crocodile"
    // (The http.url helper will group distinct URLs together in the metrics)
    response = http.del(http.url`https://test-api.k6.io/my/crocodiles/${id}/`);
    check( response, {
        "4a. Crocodile was deleted": (r) => r.status === 204
    })
Logout
We’ll complete the workflow by logging out.
    // STEP 5: Logout
    response = http.post(`https://test-api.k6.io/auth/cookie/logout/`);
    check( response, {
        "5a. Logout successful": (r) => r.status === 200,
    });
Here is the full script:
import {check, fail} from "k6";
import http from "k6/http";
import { randomString, randomIntBetween } from 'https://jslib.k6.io/k6-utils/1.2.0/index.js';

export default function() {

    // User info
    const first_name = randomString(10);
    const last_name = randomString(10);
    const email = `${first_name}.${last_name}@test.com`;
    const password = randomString(10);

    // STEP 1: Register a new user
    let response = http.post("https://test-api.k6.io/user/register/", {
        first_name,
        last_name,
        username: email,
        email,
        password
    });

    check(response, {
        '1. User registration': (r) => r.status === 201,
    }) || fail(`User registration failed with ${response.status}`);

    // STEP 2: Autheticate
    response = http.post("https://test-api.k6.io/auth/cookie/login/", { username:email, password });

    check(response, {
        "2a. login successful": (r) => r.status === 200,
        "2b. user name is correct": (r) => r.json('first_name') === first_name,
        "2c. user email is correct": (r) => r.json('email') === email
    });

    // STEP 3: Create a "crocodile" object
    const name = randomString(10);
    const sex = ['M','F'][randomIntBetween(0,1)];
    const date_of_birth = new Date().toISOString().split('T')[0];

    response = http.post("https://test-api.k6.io/my/crocodiles/",{name, sex, date_of_birth});

    const id = parseInt(response.json('id'));
    check( response, {
        "3a. Crocodile created and has and id": (r) => r.status === 201 && id && id > 0,
        "3b. Crocodile name is correct": (r) => r.json('name') === name,
    }) || fail(`Crocodile creation failed with status ${response.status}`);

    // STEP 4: Delete the "crocodile"
    // (The http.url helper will group distinct URLs together in the metrics)
    response = http.del(http.url`https://test-api.k6.io/my/crocodiles/${id}/`);
    check( response, {
        "4a. Crocodile was deleted": (r) => r.status === 204
    })

    // STEP 5: Logout
    response = http.post(`https://test-api.k6.io/auth/cookie/logout/`);

    check( response, {
        "5a. Logout successful": (r) => r.status === 200
    });
}
Bonus: Let’s run a load test
Now that we have a k6 script for this workflow, we can use it in other parts of the development lifecycle. A reusable script eliminates the need for teams to maintain similar, but separate, testing scenarios, which improves collaboration and efficiency. For example, the same script used for Synthetic Monitoring can be used by developers in a CI pipeline, and a testing center of excellence could use it to run automated functional tests or perform load testing before code reaches production.
Let’s go to Grafana Cloud k6 and use the same script to run a small load test (here, we use Grafana Cloud k6, our fully managed performance testing solution, but if you’re sharing workflows across environments, your code is probably in a repository and you’ll want to use the Terraform provider for synthetics and k6 CLI for load tests).

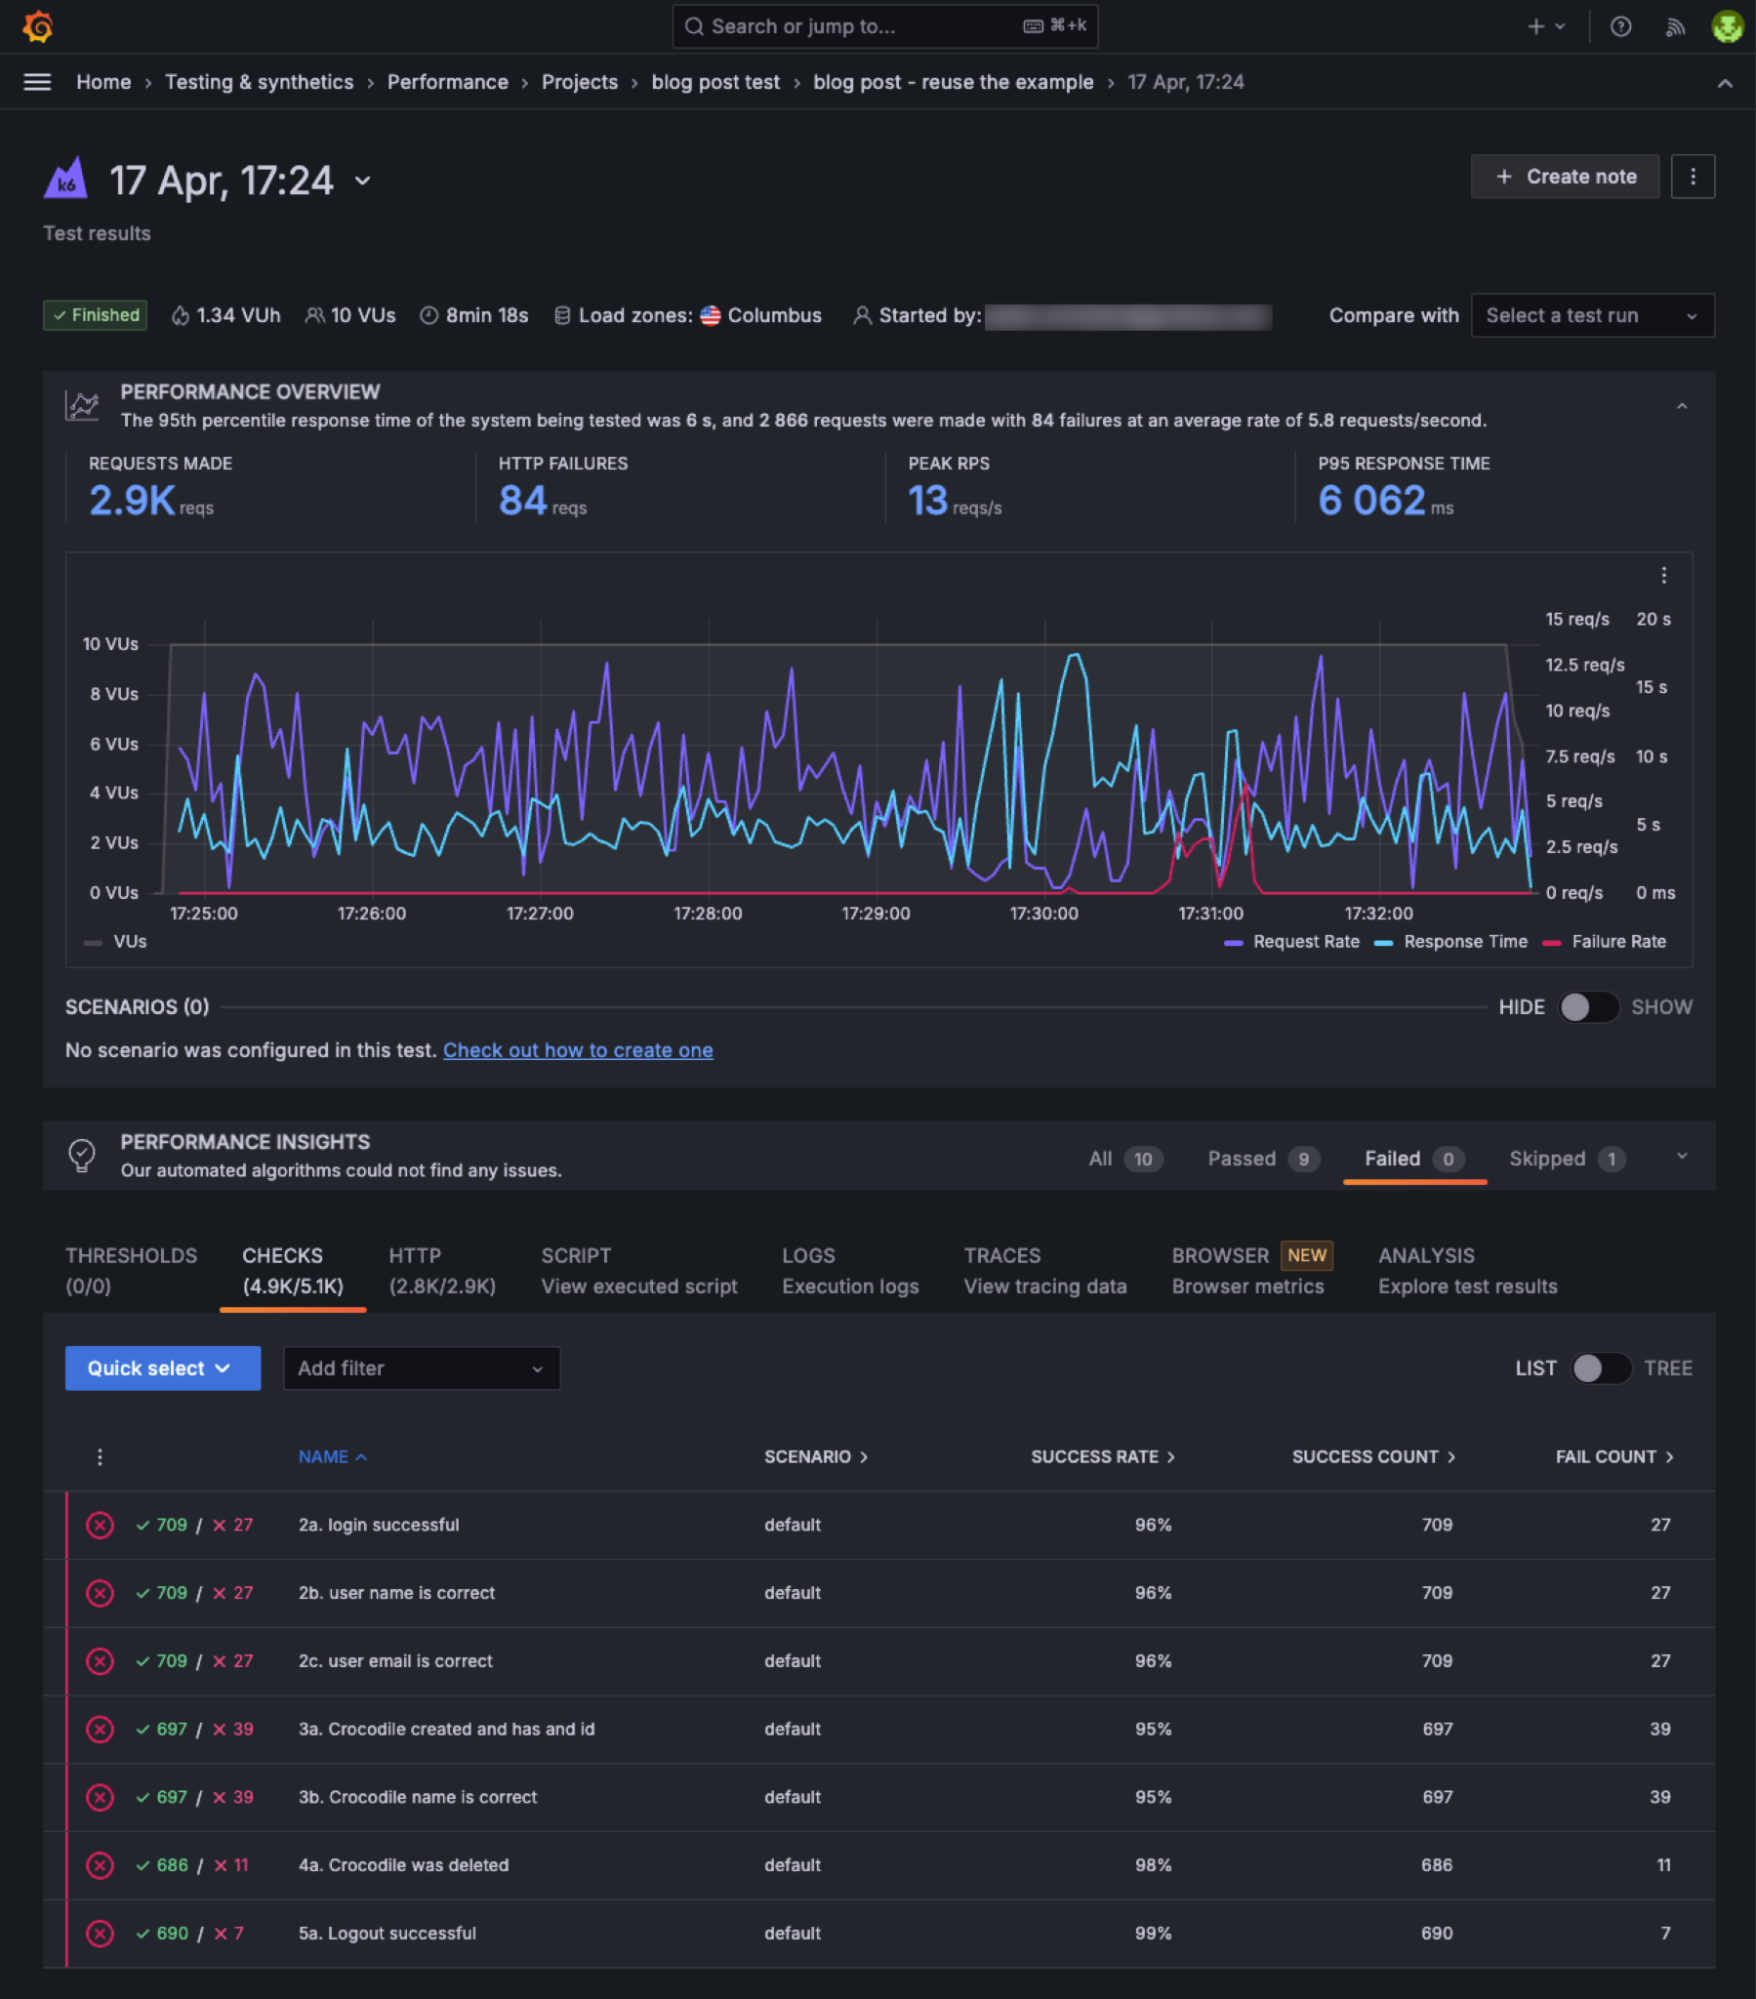
Using the same script we used for Synthetic Monitoring, we can configure additional options to control test duration, concurrency, and more (remember this is a performance test now!), and then run the load test to get the output below. (Note: test-api.k6.io is a shared, public test environment, so please don’t run heavy load tests against it.)
This gives us results by workflow step, as well as performance insights. We might run this as part of a CI pipeline, or as a scheduled load test in a development or staging environment.
Next steps
k6 Scripted and MultiHTTP checks allow you to monitor complex transactions, workflows, and critical user journeys. With Scripted checks, you have the power and flexibility of JavaScript, while MultiHTTP gives you a familiar form-based approach without having to write code. These new checks only scratch the surface of what we can do with k6. In the near future, we hope to add more of k6’s capabilities, such as supporting tests using the k6-browser module, to Synthetic Monitoring!
For more information and to get started with Synthetic Monitoring, you can check out our technical documentation.
Grafana Cloud is the easiest way to get started with synthetic monitoring. We have a generous forever-free tier that includes 100k test executions per month and more. Sign up for free now!


